


I am intrigued by the process of printing, whatever medium it may be reproduced upon, but my favorite method has always been images created from steel (or line) engraving and printed by intaglio (or recess) printing. This, of course, is the combination that produced so many of our classic postage stamps and is also seen on currency and prints or illustrations, mainly from the 19th century. The process is still used on a number of items and every year there is at least one stamp issue that receives praise from the philatelic press and collectors alike for the beauty of the engraving and printing. There are definitely more websites dedicated to engraved stamps as a specialty than, to typographed, lithographed, gravured, etc. stamps and at least two that are devoted to the stamps engraved by just one man, Czeslaw Slania.
Many of the terms used when discussing these stamps overlap or have no difference in meaning with collectors referring to line-engraved intaglio as “engraving”, “recess printed”, “line engraved”, “etched,” and others. By definition, engraving is the practice of incising a design onto a hard, usually flat surface by cutting grooves into it with a burin. The result may be a decorated object in itself, as when silver, gold, steel, or glass are engraved, or may provide an intaglio printing plate, of copper or another metal, for printing images on paper as prints or illustrations; these images are also called “engravings”. Engraving is one of the oldest and most important techniques in printmaking.
Line engraving is a term for engraved images printed on paper; in addition to being used when talking about 19th century stamps, the term is also mainly used in connection with 18th or 19th century commercial illustrations for magazines and books, or reproductions of paintings. Steel engraving is an overlapping term, for images that in fact are often mainly in etching, mostly used for banknotes, illustrations for books, magazines and decorative prints, often reproductive, from about 1820 to the early 20th century, when the technique became less used. Copperplate engraving is another somewhat outdated term for engravings. With photography long established, engravings made today are nearly all artistic ones in printmaking, but the technique is not as common as it used to be; more than other printmaking techniques, engraving requires great skill and much practice, even for an experienced artist.
Engraving for the purpose of printmaking creates plates for intaglio printing. Intaglio engravings are made by carving into a plate of a hard substance such as copper, zinc, steel, or plastic. Afterward ink is rubbed into the carved areas and away from the flat surface. Moistened paper is placed over the plate and both are run through the rollers of an intaglio press. The pressure exerted by the press on the paper pushes it into the engraved lines and prints the image made by those lines. In an intaglio print, the engraved lines print black.
Intaglio printmaking emerged in Europe well after the woodcut print, with the earliest known surviving examples being undated designs for playing cards made in Germany, using drypoint technique, probably in the late 1430s. Engraving had been used by goldsmiths to decorate metalwork, including armor, musical instruments and religious objects since ancient times, and the niello technique, which involved rubbing an alloy into the lines to give a contrasting color, also goes back to late antiquity. Scholars and practitioners of printmaking have suggested that the idea of making prints from engraved plates may well have originated with goldsmiths’ practices of taking an impression on paper of a design engraved on an object, in order to keep a record of their work, or to check the quality.
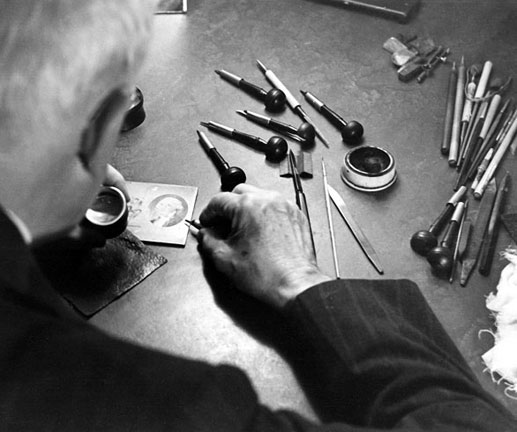
In all these figures the outline is the primary focus, followed by the lines which mark the leading folds of the drapery. These are always engravers’ lines, such as may be made naturally with the steel cutting tool called a burin, and they never imitate the freer line of the pencil or etching needle. The most important of the tools used in line-engraving is the burin, or graver, a bar of steel with one end fixed in a rounded handle, somewhat resembling a mushroom with one side cut away. The burin is shaped so that the sharpened, cutting end takes the form of a lozenge, and points downward. The burin acts exactly as a plough in the earth: it makes a furrow and turns out a shaving of metal in the same way a plough turns the soil of a field. The burin, unlike a plough, is pushed through the material. This particular characteristic at once establishes a wide separation between it, and all the other instruments employed in the arts of design, such as pencils, brushes, pens, and etching needles.
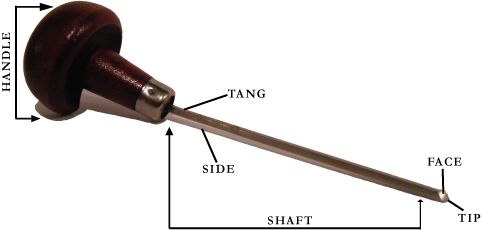

A tint burin consists of a square face with teeth, enabling the creation of many fine, closely spaced lines. A stipple tool allows for the creation of fine dots. A flat burin consists of a rectangular face, and is used for cutting away large portions of material at a time. In use, it is typically held at approximately a 30-degree angle to the surface. The index and middle finger typically guide the shaft, while the handle is cradled in the palm. Of note is the 16th-century Flemish engraver Hendrik Goltzius, whose malformed hand was ideally suited for the cradling and guiding of a burin.
Shading is used in the greatest moderation with thin straight strokes that never overpower the stronger organic lines of the design. In early metal engraving the shading lines are often cross-hatched. In the earliest woodcuts they are not. The reason being that when lines are incised, they may as easily be crossed, as not. Whereas when they are reserved, the crossing involves much non-artistic labor.
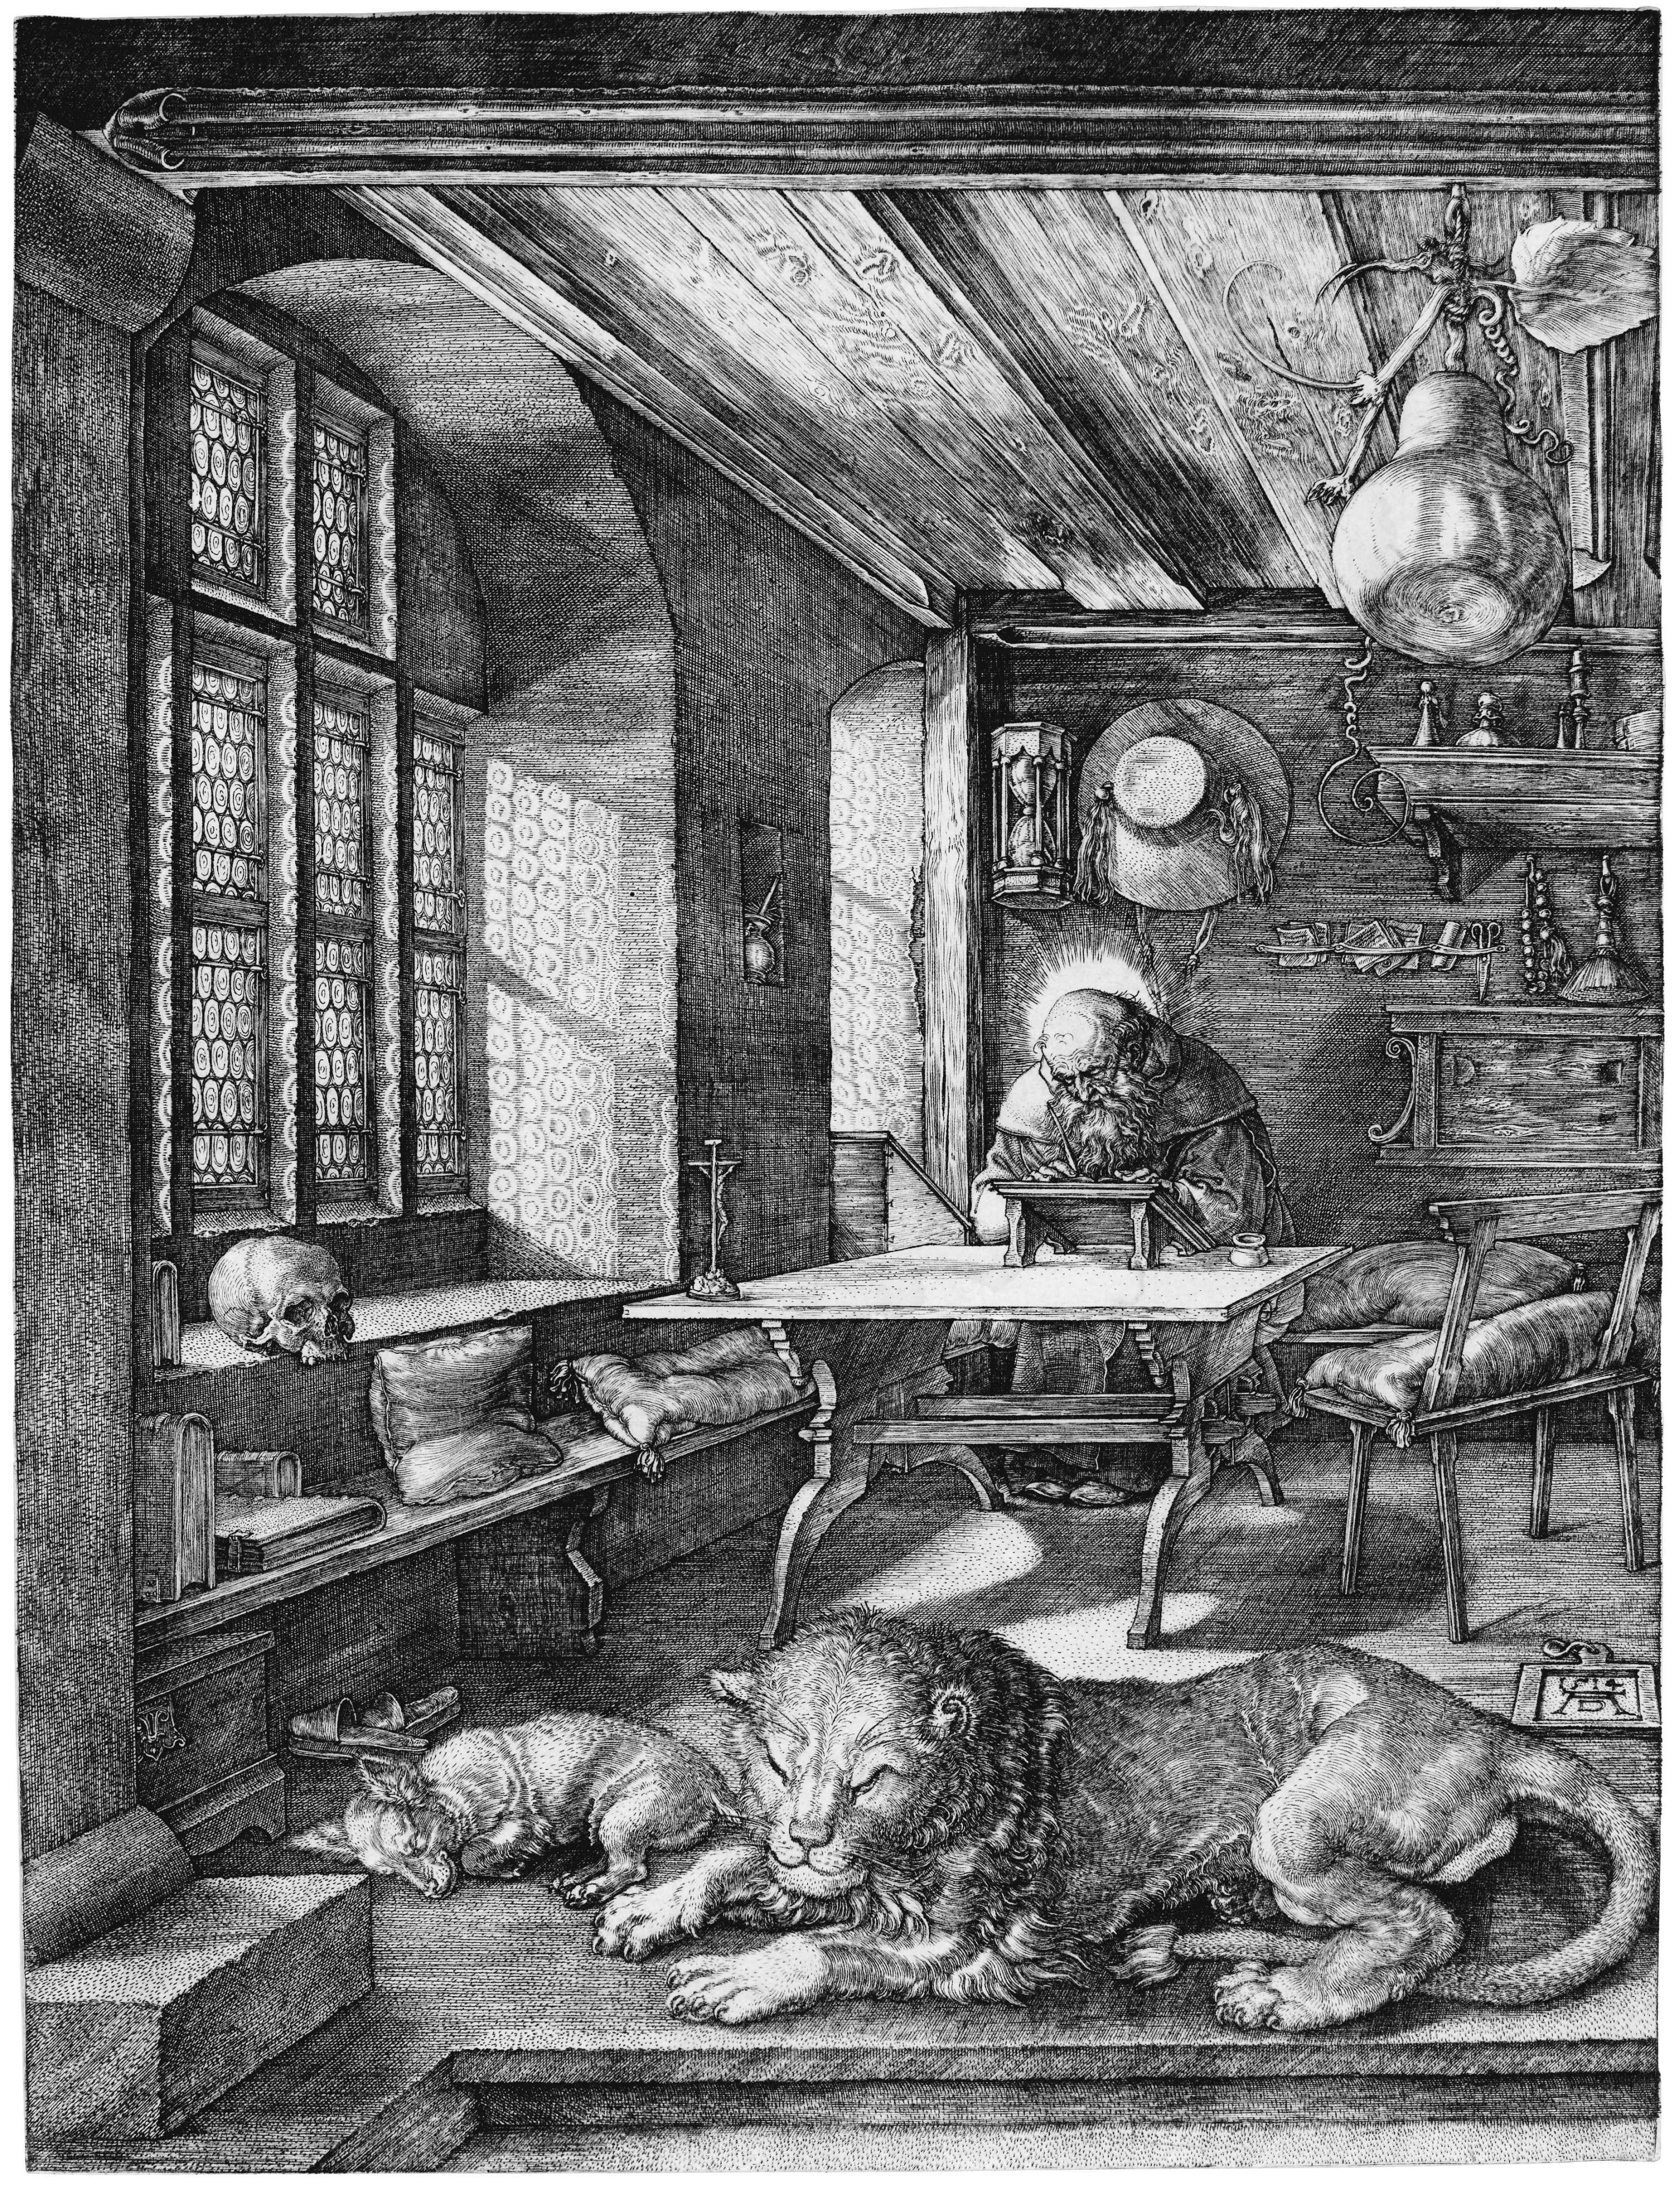
Martin Schongauer was one of the earliest known artists to exploit the copper-engraving technique, and Albrecht Dürer is one of the most famous intaglio artists. Schongauer used outline and shade as a unified element, and the shading, generally in curved lines. His skill is far more masterly than the straight shading of Mantegna, the engraver trained by Raphael. Dürer continued Schongauer’s curved shading, with increasing manual delicacy and skill, and over-loaded his plates with quantities of living and inanimate objects. He applied the same intensity of study to every art form he explored. Italian and Dutch engraving began slightly after the Germans, but were well developed by 1500. Drypoint and etching were also German inventions of the fifteenth century, probably by the Housebook Master and Daniel Hopfer respectively.
Peter Paul Rubens and the engravers he employed, made marked technical developments in the field of engraving. Instead of his finished paintings, Rubens provided his engravers with drawings as guides, allowing them to discard the Italian outline method and in its place substitute modeling. They substituted broad masses for the minutely-finished detail of the northern schools, and adopted a system of a dark and light characteristic of engraving, which reportedly Rubens stated, rendered the detail as more harmonious.
In the nineteenth century, Viennese printer Karel Klíč introduced a combined intaglio and photographic process. Photogravure retained the smooth continuous tones of photography but was printed using a chemically-etched copper plate. This permitted a photographic image to be printed on regular paper, for inclusion in books or albums.
The decline of the art of engraving was due to the fact that the public refused to wait for several years for proofs (some important proofs took as long as 12 years to create) when they could obtain their plates more quickly by other methods. The invention of steel-facing S copper plate enabled the engraver to proceed more quickly; but even in this case he could no more compete with the etcher than the mezzotint engraver could keep pace with the photogravure manufacturer.
Line-engraving flourished in France until the early 20th century, only through official encouragement and intelligent fostering by collectors and connoisseurs. The class of the work has entirely changed, however, partly through the reduction of prices paid for it, partly through the change of taste and fashion, and partly, again, through the necessities of the situation. French engravers were driven to simplify their work in order to satisfy public impatience. To compensate for loss of color, the art developed in the direction of elegance and refinement.

In the 1940s and 1950s the Italian security printer Gualtiero Giori brought intaglio printing into the era of high-technology by developing the first ever six-color intaglio printing press, designed to print banknotes which combined more artistic possibilities with greater security.
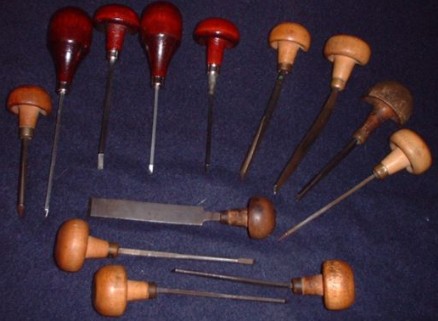
In addition to the burin, there are a number of other tools employed by the engraver. The angle tint tool has a slightly curved tip that is commonly used in printmaking. Florentine liners are flat-bottomed tools with multiple lines incised into them, used to do fill work on larger areas or to create uniform shade lines that are fast to execute. Ring gravers are made with particular shapes that are used by jewelry engravers in order to cut inscriptions inside rings. Flat gravers are used for fill work on letters, as well as “wriggle” cuts on most musical instrument engraving work, remove background, or create bright cuts. Knife gravers are for line engraving and very deep cuts. Round gravers, and flat gravers with a radius, are commonly used on silver to create bright cuts (also called bright-cut engraving), as well as other hard-to-cut metals such as nickel and steel. Square or V-point gravers are typically square or elongated diamond-shaped and used for cutting straight lines. V-point can be anywhere from 60 to 130 degrees, depending on purpose and effect. These gravers have very small cutting points. Other tools such as mezzotint rockers, roulets and burnishers are used for texturing effects. Burnishing tools can also be used for certain stone setting techniques.
The elements of engraving with the burin are evident in the engraving of letters, specifically, the capital letter B. This letter consists of two perpendicular straight lines and four distinct curves. The engraver scratches these lines, reversed, very lightly with a sharp point or stylus. Next, the engraver cuts out the blacks (not the whites, as in wood engraving) with two different burins. First, the vertical black line is ploughed with the burin between the two scratched lines, then similarly, some material is removed from the thickest parts of the two curves. Finally, the gradations from the thick middle of the curve to the thin points touching the vertical are worked out with a finer burin.
The hollows are then filled with printing ink, the surplus ink is wiped from the smooth surface of the metal, damped paper is laid upon the surface and driven into the hollowed letter by the pressure of a revolving cylinder. The paper draws out the ink, and the letter B is printed in intense black.
When the surface of a metal plate is sufficiently polished to be used for engraving, the slightest scratch upon it will print as a black line. An engraved plate from which visiting cards are printed is a good example of some elementary principles of engraving. It contains thin lines and thick ones, as well as a considerable variety of curves. An elaborate line engraving, if it is a pure line engraving and nothing else, will contain only these simple elements in different combinations. The real line engraver is always engraving a line more or less broad and deep in one direction or another; he has no other business than this.

In steel engraving, the illustrations are based on steel rather than copper plates. Engraving is done with a burin pushed along the plate to produce thin furrowed lines, leaving “burr” or strips of waste metal to the side. This is followed by the use of a scraper to remove any burs, since they would be an impediment during the subsequent inking process. Steel plates are very hard for this technique, which is normally used on softer copper plates. So steel engraving also used etching, where acid creates the lines in the plates in the pattern made by selectively removing a thin coating of acid-resistant ground by tools. This is much less effort. As well as etching needles, the etched part of steel engravings made great use of roulettes, small wheels mounted in handles which have regular sharp projections which produce broken lines of dots and dashes when rolled across the plate. Roulettes of different types were used together with the burin and needle to create densely packed marks which appear as tonal to the eye, and allow a great variety of textures and effects. True burin engraving was generally used to finish the etched image.
First a broad, general outline is made on the plate before starting the detailed image. Engraving will produce a printed reverse or mirror image of the image on the plate. Sometimes engravers looked at the object, usually another image such as a drawing, that they were engraving through a mirror so that the image was naturally reversed and they would be less likely to engrave the image incorrectly.
Steel plates can be case hardened to ensure that they can print thousands of times with little wear. The copper plates used in traditional engraving and etching, which are softer and so much easier to work cannot be case hardened but can be steel-faced or nickel-plated by electroplating to increase the number of impressions that could be printed. From about 1860 the steel-facing of copper plates became widely used, and such prints tend also to be called steel engravings. It can be very difficult to distinguish between engravings on steel and steel-faced copper, other than by date. The most reliable way of distinguishing between unfaced copper engraving and steel or steel-faced engraving is the “lightness and delicacy of the pale lines” in the latter. The hardness of the plate surface made it possible to print a good number of impressions without the metal of the plate wearing the lines out under the pressure of repeated intaglio printing, which would have happened with unfaced copper. So “A shimmering pale grey became for the first time a possibility in line engraving, and it is this that provides the most recognizable characteristic of steel beside the heavier and warmer mood of copper”.
Modern professional engravers can engrave with a resolution of up to 40 lines per mm in high grade work creating game scenes and scrollwork. In addition to hand engraving, today there are engraving machines that require less human finesse and are not directly controlled by hand. They are usually used for lettering, using a pantographic system. There are versions for the insides of rings and also the outsides of larger pieces. Such machines are commonly used for inscriptions on rings, lockets and presentation pieces.
When the plates are created by the engraver, these can be printed by the intaglio process. Sometimes this is also called engraved or recess printing. Intaglio is the family of printing and printmaking techniques in which the image is incised into a surface and the incised line or sunken area holds the ink. It is the direct opposite of a relief print. Normally, copper or zinc plates are used as a surface or matrix, and the incisions are created by etching, engraving, drypoint, aquatint or mezzotint. Collagraphs may also be printed as intaglio plates.
In intaglio printing, the lines to be printed are cut into a metal plate by means either of a burin, in which case the process is called engraving; or through the corrosive action of acid (etching). In etching, for example, the plate is covered in a resin ground or an acid-resistant wax material. Using an etching needle, or a similar tool, the image is engraved into the ground, revealing the plate underneath. The plate is then dipped into acid. The acid bites into the surface of the plate where it was exposed. Biting is a printmaking term to describe the acid’s etching, or incising, of the image. After the plate is sufficiently bitten, the plate is removed from the acid bath, and the ground is removed to prepare for the next step in printing.
Intaglio printing process


To print an intaglio plate, ink is applied to the surface by wiping and/or dabbing the plate to push the ink into the recessed lines, or grooves. The plate is then rubbed with tarlatan cloth to remove most of the excess ink. The final smooth wipe is often done with newspaper or old public phone book pages, leaving ink only in the incisions. A damp piece of paper is placed on top of the plate, so that when going through the press the damp paper will be able to be squeezed into the plate’s ink-filled grooves. The paper and plate are then covered by a thick blanket to ensure even pressure when going through the rolling press. The rolling press applies very high pressure through the blanket to push the paper into the grooves on the plate.[7] The blanket is then lifted, revealing the paper and printed image.
At one time, intaglio printing was used for all mass-printed materials including banknotes, stock certificates, newspapers, books, maps and magazines, fabrics, wallpapers and sheet music. Today intaglio engraving is largely used for paper or plastic currency, banknotes, passports and occasionally for high-denomination postage stamps. The appearance of engraving is sometimes mimicked for items such as wedding invitations by producing an embossment around lettering printed by another process (such as lithography or offset) to suggest the edges of an engraving plate.
As mentioned before, the best known stamp engraver is Czeslaw Slania whose work has been featured in at least four A Stamp A Day articles (his name doesn’t always appear on the stamps). I’ve included brief profiles of Slania here and here. Websites dedicated to his work include a tribute page by Chuck Matlack and a database of his work by Ann Mette Heindorff. I was surprised to learn that he did not engrave the stamps issued for Stockholmania 86 (a joint issue with the United States’ AMERIPEX 86 issue) although he was the Royal Court Engraver for Sweden at the time. In addition to the Slania sites mentioned, I also recommend the Engraved Stamps database and the Stamp Engravers blog.
Scott #1586 is part of a booklet pane of four stamps released on January 23, 1986, marking the STOCKHOMIA 86 stamp exhibition (Scott #1588a). It was a joint issue with the United States; the U.S. counterpart is Scott #2201a which promoted the AMERIPEX 86 stamp show with four Stamp Collecting themed stamps.
The stamps in the Swedish booklet picture an early Swedish stamp (Scott #33a issued in 1879) with a bull’s-eye cancel on one of two 2-krona values (Scott #1585), stamp engraver Sven Ewert preparing a stamp die on the second 2-krona stamp (Scott #1586), a page from a stamp album bearing two Swedish stamps (Scott #268 and #271) and a magnifying glass enlarging a United States 3-¢ent Landing of the Swedes and Finns stamp (Scott #836) on a stamp denominated at 3 krona (Scott #1587), and a boy using tongs to retrieve stamps for his collection after soaking in a bowl of water (Scott #1588) on the 4-krona value. All four stamps were printed by lithography and engraving, perforated 11. They were designed by Richard Sheaff, except the magnifying glass stamp, which was designed by Eva Jern. The American stamps were lithographed and engraved by Sterling Sommers for Ashton-Potter (USA) Ltd., perforated 10 vertically.

